Windows + Docker + Magento + Sonarqube

1: Install Docker on windows::


1.1: download docker desktop application from https://www.docker.com/products/docker-desktop
1.2: Install the app to your windows system
1.3: Add below path to your environment variables
– C:\Program Files\Docker\Docker\resources\bin
– C:\ProgramData\DockerDesktop\version-bin
1.4: Go to “Command Prompt” and type “docker -v”. If you get the docker version, it is installed correctly on your system.

2: Install Sonarqube::


2.1: Go to command prompt
2.2: Execute command: “docker pull sonarqube”. It will download sonarqube to your system.
2.3: To run sonarqube, execute : “docker run sonarqube”
2.4: After the execution is completed, go to your browser and open http://127.0.0.1:9000/ in a new tab.
2.5: You will see login screen, use admin/admin as username and password.
2.6: Now go to http://127.0.0.1:9000/projects/create/ click on “Manually” to connect sonarqube with your local magento instance
2.7: Add Project Name and project key
2.8: Click on “Set up”
2.9: Select “Locally” option from the list
2.10: It will ask to generate a token for your project. Add a name for your token and click on generate.
2.11: It will generate a key. Copy and store the key in your system
2.12: Click on continue
2.13: Select “Other” for Magento project
2.14: Select your OS, in our case “Windows”
2.15: It will open a few details about the project and will ask you to install sonarqube scanner. (KEEP THE SCREEN OPEN, WE WILL NEED IT IN FUTURE)

3: Install Sonarqube scanner::


3.1: Go to https://docs.sonarqube.org/latest/analysis/scan/sonarscanner/ and download windows-64 bit scanner.
3.2: You can directly use the link : https://binaries.sonarsource.com/Distribution/sonar-scanner-cli/sonar-scanner-cli-4.7.0.2747-windows.zip
3.3: It will download a zip file.
3.4: Extract the zip and put it in any location of your system. In our case let’s add it in D:\docker\sonar-scanner
3.5: Now go to Environment variable and add a new path “D:\docker\sonar-scanner\bin”

4: Connect sonarqube with your local magento instance::


4.1: First, go to the sonarqube screen where we were setting up our project.
4.2: Got to “Execute the Scanner” section, you will find a command provided to execute sonarqube on your project.
4.3: Copy the command
4.4: Now, go to your Magento’s root directory and create a new file with name: “sonar-project.properties”
4.5: Add below code in the file.

sonar.projectKey=Magento (Your Project Key you created in sonarqube at step 2.7)
sonar.projectName=Magento (Your Project Key you created in sonarqube at step 2.7)
sonar.sources=app/code
sonar.projectBaseDir=app/code
sonar.exclusions=/Test/, /registration.php sonar.test.exclusions=/Test/**
sonar.php.coverage.reportPaths=reports/clover.xml

4.6: Now open your magento root directory in command prompt/
4.7: Execute the command copied at 4.3
– sonar-scanner.bat -D”sonar.projectKey=Test” -D”sonar.sources=.” -D”sonar.host.url=http://127.0.0.1:9000″ -D”sonar.login=0d3ee79ef3db6b83d221ef12a727b2fcfc93fad9″
4.8: It will start scanning your app/code directory. Once completed, your browser page (step 2.15) will get refreshed and you will see a complete report for your app/code directory.

Magento PWA – How to add a custom page

Magento pwa-studio provides you with pages like, product pages, category pages, Home page and create account page (for now). With real world apps, you require to create many custom pages for your site. With this post, I will explain how you can add custom pages to your pwa-studio.

To add a custom page, you will first need to add your urlKey in venia-upward.yml file. This file is responsible for matching requested url and the response to return. You can check response: > when: code block and you will find something like below.

- matches: request.url.pathname
pattern: '^/create-account'
use: index

This code block is responsible for handling url pattern create-account. So if you pass create-account in your browser url, it will match the pattern and will use “index” shell for response. If you go further down the file, you will find the definition for index shell like below.

# The index object contains response data for rendering a generic app shell
index:
  inline:
    status: 200
    headers:
      inline:
        content-type:
          inline: text/html
    body:
      engine: mustache
      template: './templates/generic-shell.mst'
      provide:
        isDevelopment: isDevelopment

To add my page, I have used a custom shell, (you can also use the index shell without creating a custom shell). So first, I have added a urlKey pattern for my page under response like below. Add below code right after create-account “url pattern match” code block described above.

# My Custom Page
- matches: request.url.pathname
pattern: '^/my-page'
use: myCustomShell

Here, we added a url pattern for our page as my-page, this code block will get executed when there is a url request for my-page in browser. Here, I have added a custom shell myCustomShell to handle my page request. Now you will require to create your shell. Add below code for creating your shell right under the completion for index shell. If you are using default index shell, you can skip below step.

Please note here that if you are going to use index shell for your route, your page will not load when refreshing the page. So, if you need your page to work on page refresh, you will require to use a custom shell like below.

# My custom shell
myCustomShell:
  inline:
    status: 200
    headers:
      inline:
        content-type:
          inline: text/html
    body:
      engine: mustache
      template: './templates/generic-shell.mst'
      provide:
        model: genericObject
        bundles: assetManifest.bundles
        urlResolver: urlResolver
        env: env

That’s it with creating a route for your page. Let’s create a simple component with static content which will respond to our route request. Create a new file at packages/venia-concept/src/components/MyCustomPage/myCustomPage.js

import React, { Component } from 'react';
import PropTypes from 'prop-types';
import { withRouter } from 'src/drivers';
import { compose } from 'redux';

class MyCustomPage extends Component {
    static propTypes = {
        initialValues: PropTypes.shape({}),
        history: PropTypes.shape({})
    };

    customPage = () => {
        const { history } = this.props;
    };

    render() {
        return <div>This is my Custom Page</div>;
    }
}

export default compose(
    withRouter,
    classify(defaultClasses)
)(MyCustomPage);

This component will only display a text on the page “This is my Custom Page”

Now, edit your packages/venia-concept/src/components/App/renderRoutes.js file and add your component with your route URL like below.

import React from 'react';
import { Switch, Route } from 'react-router-dom';
import { Page } from '@magento/peregrine';
import ErrorView from 'parentComponents/ErrorView/index';
import CreateAccountPage from 'parentComponents/CreateAccountPage/index';
import Search from 'src/RootComponents/Search';
import MyCustomPage from 'src/components/MyCustomPage/myCustomPage'; // import your component

const renderRoutingError = props => <ErrorView {...props} />;

const renderRoutes = () => (
    <Switch>
        <Route exact path="/search.html" component={Search} />
        <Route exact path="/create-account" component={CreateAccountPage} />
        <Route exact path="/my-page" component={MyCustomPage} />
        <Route render={() => <Page>{renderRoutingError}</Page>} />
    </Switch>
);

export default renderRoutes;

Now, go to your pwa storefront and in URL, use my-page and press enter. You will be able to see your custom page content on the same. That’s it with creating a new page with custom route. You can customise your component to use any type of data and content you want to show on the page.

JS Launcher – Version 2.0.2 is released

Hello friends, A new version of JS Launcher is released now. The latest version 2.0.2, includes the functionality to go to any category using launcher popup.

Press CTRL+M and start typing the category name, it will give you all the matching categories. Select and press enter or click on desired category to go to category edit page.

JS Launcher – Category Search

Magento PWA – Quantity Increment Decrement Component

Current Magento pwa-studio provides you a dropdown field for quantity selection on product detail page which I found very amusing as it is literally useless for real world applications.
Quantity field on product details page only contains 1 to 4 quantity selection from dropdown and there is no option to the user to add more if he needs.

With this post, I will show you how we can replace this with an increment decrement field which makes more sense for a quantity field. I have created a separate component for this. Below are the things I did to achieve it.
First of all create a new component with name “ProductQuantityIncDec

Create a new file pwa-studio/packages/venia-concept/src/components/ProductQuantityIncDec/index.js
This will be a simple index file.

export { default } from './quantity';

Create another file with name pwa-studio/packages/venia-concept/src/components/ProductQuantityIncDec/quantity.js
This file contains all the elements like quantity textbox, increment and decrement buttons and quantity update functionality.

import React, { Component } from 'react';
import { arrayOf, number, shape, string } from 'prop-types';

import classify from 'src/classify';
import defaultClasses from './quantity.css';
import { Text } from 'informed';

class Quantity extends Component {
    static propTypes = {
        classes: shape({
            root: string,
            increment_button: string,
            decrement_button: string,
            quaText: string,
            quaBtn: string
        })
    };

    state = {
        quantity: 1,
        show: true,
        max: 9999,
        min: 1
    };

    constructor(props) {
        super(props);
        this.ref = React.createRef();
    }

    incrementQty = () => {
        this.setState(prevState => {
            if(prevState.quantity < this.state.max) {
                this.ref.current.value = this.state.quantity + 1;
                this.props.clickHandler(this.state.quantity + 1);
                return {
                    quantity: parseInt(prevState.quantity) + 1
                }
            } else {
                return null;
            }
        });
    };
    decrementQty = () => {
        this.setState(prevState => {
            if(prevState.quantity > this.state.min) {
                this.ref.current.value = this.state.quantity - 1;
                this.props.clickHandler(this.state.quantity - 1);
                return {
                    quantity: parseInt(prevState.quantity) - 1
                }
            } else {
                return null;
            }
        });
    };
    
    handleChange =(event)=>{
        let elementValue = parseInt(event.target.value) || 0 ;
        if(elementValue != '' && elementValue != '0') {
            this.setState({quantity: elementValue});
        }
        else {
            this.setState({quantity: ''});
        }
        var event = new Event('input', { bubbles: true });
        this.ref.current.dispatchEvent(event);
    }

    render() {
        const { classes, ...restProps } = this.props;
        return (
            <div className={classes.root}>
	            <div className={classes.quaBtn}>
	            	<span onClick={this.decrementQty} className={classes.decrement_button}>-</span>
	           	</div>
	            <div className={classes.quaText} >
	            	<Text
	                className={classes.quantity_input}
	                initialValue={`${this.state.min}`}
	                field="quantity"
	                label=""
	                forwardedRef={this.ref}
	                onChange = {this.handleChange}
	                />
	            </div>
	            <div className={classes.quaBtn}>
	            	<span onClick={this.incrementQty} className={classes.increment_button}>+</span>
	            </div>
            </div>
    );
    }

}
export default classify(defaultClasses)(Quantity);

I have also added a css file to add styling for the elements.

.root {
    display: flex;
    width: 100%;
}
.quantityTitle {
    font-size: 14px;
    font-weight: normal;
    margin: 0 0 10px 0;
}
.quantityBox {
    display: table;
    width: 100%;
    height: 36px;
    width: 100%;
}
.quaBtn {
    display: inline-block;
    width: 40px;
    vertical-align: top;
    height: 40px;
}
.quaBtn span {
    border-radius: 4px;
    background: #ebebeb;
    height: 36px;
    font-size: 28px;
    line-height: 30px;
    cursor: pointer;
    width: 40px;
    display: block;
    text-align: center;
}
.quaText {
    display: inline-block;
    vertical-align: top;
    width: 56px;
    height: 36px;
    padding: 0 5px;
}
.quaText input {
    width: 100%;
    height: 36px;
    text-align: center;
    border: #eeeeee solid 1px;
    color: #333;
    font-size: 15px;
    font-weight: 700;
    margin: 0;
    border-radius: 4px;
}
.errormsg {
    display: block;
    font-size: 13px;
    color:red;
}

That’s it. This is the component for quantity increment-decrement field. Now you can use it in your product details page to replace existing dropdown. To add the component on Product details page, edit your pwa-studio/packages/venia-concept/src/components/ProductFullDetail/ProductFullDetail.js file and import our newly created component.

import QuantityIncDecField from 'src/components/ProductQuantityIncDec';

Now replace the quantity dropdown code with below code to add our component.

<QuantityIncDecField clickHandler={this.setQuantity}/>

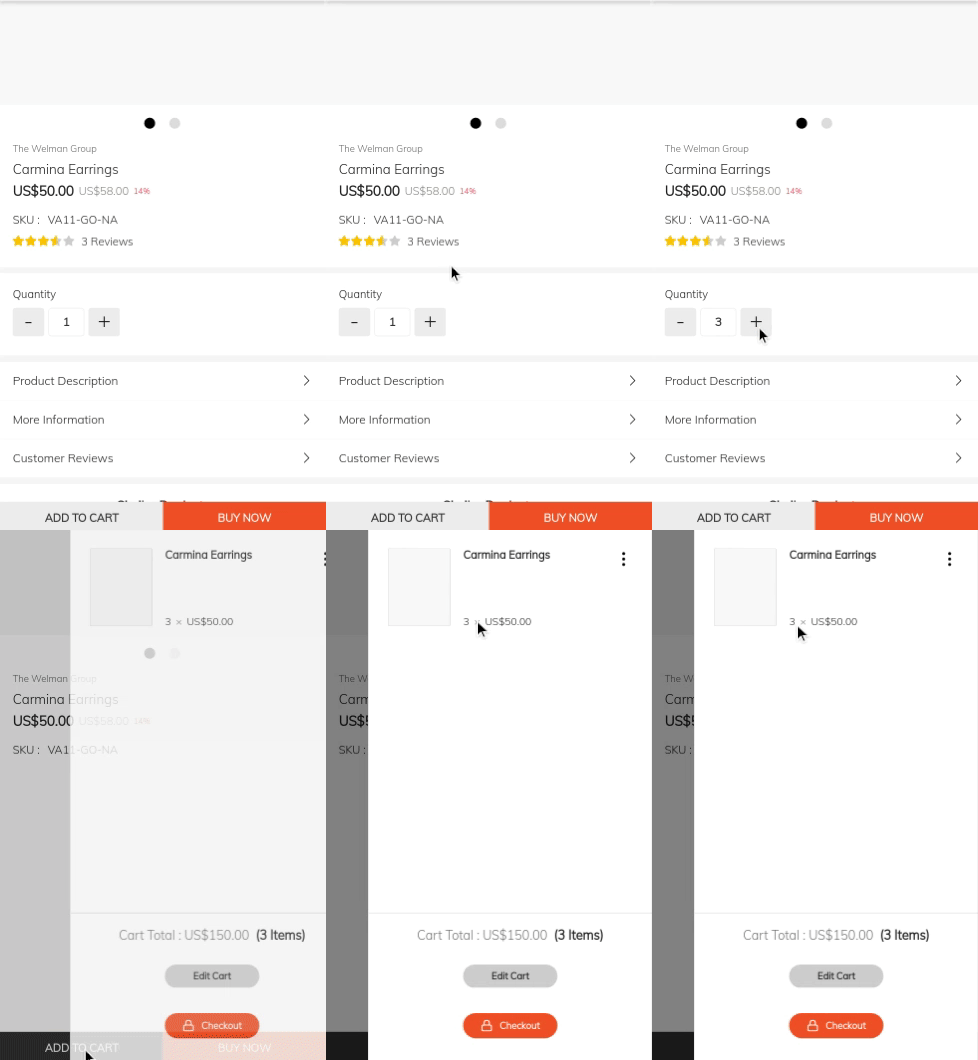
The component will display like below.

Magento PWA – Quantity Increment Decrement Component

Magento PWA – How to get Static block content

Magento static blocks are a great way to manage your content on your store. It provides admin the flexibility to add/update/remove content on your site. It could be a promotional banner, a static html content or a featured section. No matter the use of it, but static blocks are a very useful part of any page. So, if you are going to create a PWA for your Magento, you will require to manage your content on your PWA storefront too. With this post, I will explain you how you can add your Magento static block on your PWA storefront.

Magento pwa-studio provides a component which gets you the content of your CMS block from Magento and displays on your page. Below are the steps how you can utilise this component.

First, include the component to your page, lets assume you want to add a promotional banner on your homepage. You have created a static block in your admin panel with identifier as homepage-promotional-banner
To add this block on homepage, go to src/pwa-studio/packages/venia-concept/src/RootComponents/CMS/CMS.js and add your CmsBlock component.

import CmsBlock from 'src/components/CmsBlock';

This will import pwa-studio’s default CmsBlock component to your page. Now you can use it like below in your render() function.

<CmsBlock identifiers={'homepage-promotional-banner'} />

It is a very simple component which accepts one argument. The argument name is identifiers which accepts the identifier value of your CMS block which you added while creating the block in your Magento admin panel.

If you want to display multiple CMS blocks, you can use the same component with multiple argument like below. identifiers prop accepts two types of values.
1. String
2. Array

You can pass multiple identifiers in array format to get content of multiple CMS blocks.

<CmsBlock identifiers={['homepage-promotional-banner','homepage-offers']} />

Above code will display both of your cms blocks matching provided identifier on your page.

That’s it guys. Its as simple as that to add a static block content on your pwa page.

Magento PWA – Get Related, Upsell and Cross sell products

As working on Magento pwa-studio, I needed to show my related products at product details page. For that I created a new component in pwa-studio which will get me the details of related products of my current product.

With this tutorial, I’ll show you how I got to achieve this with code. Pwa-studio product details page does not display related products or upsell products by default(for now). Magento already have a graphQL for fetching product details which also includes its linked products. So, you only need to add those data with your GraphQL request and Magento will serve you with all linked products to current product.
Here is how I did it, you will require to create 4 new files to do this.

packages/venia-concept/src/components/LinkedProducts/index.js This file will be the initial index point for our component file.

export { default } from './LinkedProducts';

Now create a file packages/venia-concept/src/components/LinkedProducts/LinkedProducts.js with below code.

import React, { Component } from 'react';
import { shape, string} from 'prop-types';
import { compose } from 'redux';

import classify from 'src/classify';
import { Query } from 'src/drivers';
import defaultClasses from './LinkedProducts.css';
import galleryClasses from 'src/components/Gallery/gallery.css';
import categoryClasses from 'src/RootComponents/Category/category.css';
import GalleryItems, { emptyData } from 'src/components/Gallery/items';
import linkedProductsQuery from 'src/queries/linkedProducts.graphql';

class LinkedProducts extends Component {
    static propTypes = {
        classes: shape({
            similar_products_title: string,
            similar_products_container: string,
            gallery: string,
            items: string
        })
    };
    get relatedProducts() {
        const { props, state } = this;
        const { product, classes, linkType, title, itemCount } = props;
        const hasData = Array.isArray(product.product_links) && product.product_links.length;
        const items = hasData ? product.product_links : emptyData;
        var skus = [];
        console.log(items.length)
        if(items.length) {
            skus = items.reduce(function (filtered, option) {
                if (option && option.link_type == linkType) {
                    filtered.push(option.linked_product_sku);
                }
                return filtered;
            }, []);
            skus = skus.slice(0, itemCount);
        }
        return (
            <Query query={linkedProductsQuery}
                    variables={{
                        skus
                    }}>
                {({ loading, error, data }) => {
                    if (error) {
                        return '';
                    }
                    if (loading) {
                        return <div>Fetching Products</div>;
                    }
                    const similarItems = data.products.items;

                    if(similarItems.length) {
                        return (
                            <div className={classes.similar_products_container}>
                            <span className={classes.similar_products_title}>{title}</span>
                            <div className={classes.items}>
                                <GalleryItems
                                    items = {similarItems}
                                    pageSize = {4}
                                />
                            </div>
                        </div>
                        )
                    } else {
                        return "";
                    }
                }}
            </Query>
        );
    }
    render() {
        const {
            props,
            relatedProducts
        } = this;
        const { classes, isAddingItem, product } = props;

        return (
            <section className={classes.similar_products}>{relatedProducts}</section>
        );
    }
}

export default compose(
    classify(defaultClasses),
    classify(galleryClasses),
    classify(categoryClasses)
)(LinkedProducts);

Above is the main component which handles all the logic to get and display related products on your product details page.
Now, create a css file to format your block. I have added simple stylesheet for my block for reference, you can update it as per your requirements.
Create a css file packages/venia-concept/src/components/LinkedProducts/LinkedProducts.css with below code.

.root {
     display: block;
 }
 .similar_products_title {
     text-align: center;
     display: block;
     font-size: 22px;
     font-weight: bold;
     line-height: 40px;
     margin: 15px 0;
 }
 .similar_products_container {
    display:block;
 }

Now, to get the data, you will require a graphql file.

I created a new graphql for my requirement. This graphql will accept an array of Product sku and will return all the products matching those skus. You can use this same graphql for any of your need where you have a set of product skus and you want to get those product details in your pwa storefront.

Create a new file with name packages/venia-concept/src/queries/linkedProducts.graphql

query linkedProducts($skus: [String]) {
     products(filter: { sku: { in: $skus } }) {
         items {
             id
             name
             small_image {
                 url
             }
             url_key
             price {
                 regularPrice {
                     amount {
                         value
                         currency
                     }
                 }
             }
         }
     }
 }

Now, you have done creating your component. To display the data, you will require to import this block in your file. e.g. packages/venia-concept/src/components/ProductFullDetail/ProductFullDetail.js
Import your component at header section of the file with code.

import LinkedProducts from 'src/components/LinkedProducts';

Add your component where you want to display in the render() function. I added it just before the closing </Form> component like below.

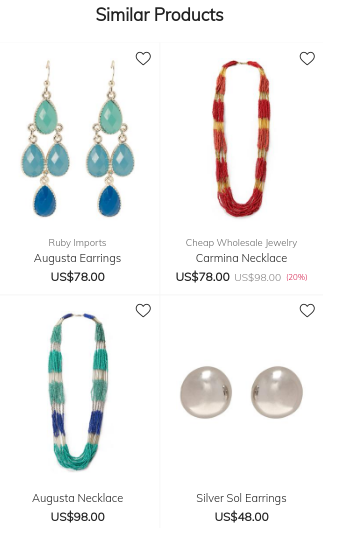
<LinkedProducts product={product} linkType={'related'} title={'Similar Products'} itemCount={4} />

Here, I have added four properties to make this component dynamic. Below is the description for each prop.

product: It will accept product object as its value
linkType: It will accept any of the three types you want to display e.g. related (to show related products), upsell (to show upsell products) and crosssell (to show cross sell products)
title: Here you can add the title you want to display for your section.
itemCount: It allows to limit the number of products to display in the section.

The section will display like below.

Magento GraphQL – How to Extend schema.graphqls and inject custom fields

Magento community is now implementing graphql support with all its modules day by day. You will find a separate graphql module to Magento’s default module. e.g. there is a module module-catalog-graph-ql to handle graphql details for magento-catalog module.

The “graphql-modules” has all their graphql request definition and their resolver class stored in schema.graphqls file in etc folder. This file contains all the information of the graphql requests, their data fields and the class which will serve data for each field. Lets take example for the graphql handling product detail requests.

Go to vendor/magento/module-catalog-graph-ql/etc/schema.graphqls.
Here you will see configuration which handles Product queries at ProductInterface interface.

interface ProductInterface @typeResolver(class: "Magento\\CatalogGraphQl\\Model\\ProductInterfaceTypeResolverComposite") @doc(description: "The ProductInterface contains attributes that are common to all types of products. Note that descriptions may not be available for custom and EAV attributes.") {
    id: Int @doc(description: "The ID number assigned to the product") @resolver(class: "Magento\\CatalogGraphQl\\Model\\Resolver\\Product\\EntityIdToId")
    name: String @doc(description: "The product name. Customers use this name to identify the product.")
    sku: String @doc(description: "A number or code assigned to a product to identify the product, options, price, and manufacturer")
    description: ComplexTextValue @doc(description: "Detailed information about the product. The value can include simple HTML tags.") @resolver(class: "\\Magento\\CatalogGraphQl\\Model\\Resolver\\Product\\ProductComplexTextAttribute")
    short_description: ComplexTextValue @doc(description: "A short description of the product. Its use depends on the theme.") @resolver(class: "\\Magento\\CatalogGraphQl\\Model\\Resolver\\Product\\ProductComplexTextAttribute")
    special_price: Float @doc(description: "The discounted price of the product")
    special_from_date: String @doc(description: "The beginning date that a product has a special price")
    special_to_date: String @doc(description: "The end date that a product has a special price")
    attribute_set_id: Int @doc(description: "The attribute set assigned to the product")
    meta_title: String @doc(description: "A string that is displayed in the title bar and tab of the browser and in search results lists")
    meta_keyword: String @doc(description: "A comma-separated list of keywords that are visible only to search engines")
    meta_description: String @doc(description: "A brief overview of the product for search results listings, maximum 255 characters")
    image: ProductImage @doc(description: "The relative path to the main image on the product page") @resolver(class: "Magento\\CatalogGraphQl\\Model\\Resolver\\Product\\ProductImage")
    small_image: ProductImage @doc(description: "The relative path to the small image, which is used on catalog pages") @resolver(class: "Magento\\CatalogGraphQl\\Model\\Resolver\\Product\\ProductImage")
    thumbnail: ProductImage @doc(description: "The relative path to the product's thumbnail image") @resolver(class: "Magento\\CatalogGraphQl\\Model\\Resolver\\Product\\ProductImage")
    new_from_date: String @doc(description: "The beginning date for new product listings, and determines if the product is featured as a new product") @resolver(class: "Magento\\CatalogGraphQl\\Model\\Resolver\\Product\\NewFromTo")
    new_to_date: String @doc(description: "The end date for new product listings") @resolver(class: "Magento\\CatalogGraphQl\\Model\\Resolver\\Product\\NewFromTo")
    tier_price: Float @doc(description: "The price when tier pricing is in effect and the items purchased threshold has been reached")
    options_container: String @doc(description: "If the product has multiple options, determines where they appear on the product page")
    created_at: String @doc(description: "Timestamp indicating when the product was created")
    updated_at: String @doc(description: "Timestamp indicating when the product was updated")
    country_of_manufacture: String @doc(description: "The product's country of origin")
    type_id: String @doc(description: "One of simple, virtual, bundle, downloadable, grouped, or configurable")
    websites: [Website] @doc(description: "An array of websites in which the product is available") @resolver(class: "Magento\\CatalogGraphQl\\Model\\Resolver\\Product\\Websites")
    product_links: [ProductLinksInterface] @doc(description: "An array of ProductLinks objects") @resolver(class: "Magento\\CatalogGraphQl\\Model\\Resolver\\Product\\ProductLinks")
    media_gallery_entries: [MediaGalleryEntry] @doc(description: "An array of MediaGalleryEntry objects") @resolver(class: "Magento\\CatalogGraphQl\\Model\\Resolver\\Product\\MediaGalleryEntries")
    tier_prices: [ProductTierPrices] @doc(description: "An array of ProductTierPrices objects") @resolver(class: "Magento\\CatalogGraphQl\\Model\\Resolver\\Product\\TierPrices")
    price: ProductPrices @doc(description: "A ProductPrices object, indicating the price of an item") @resolver(class: "Magento\\CatalogGraphQl\\Model\\Resolver\\Product\\Price")
    gift_message_available: String @doc(description: "Indicates whether a gift message is available")
    manufacturer: Int @doc(description: "A number representing the product's manufacturer")
    categories: [CategoryInterface] @doc(description: "The categories assigned to a product") @resolver(class: "Magento\\CatalogGraphQl\\Model\\Resolver\\Categories")
    canonical_url: String @doc(description: "Canonical URL") @resolver(class: "Magento\\CatalogGraphQl\\Model\\Resolver\\Product\\CanonicalUrl")
}

You can see here all the fields product details graphql can ask for and can get data in pwa-studio. But what if you want to get more data than what is provided here. Suppose, I want to add a new field to this interface which will give me some data like brand name of my product, what are the steps you can follow to achieve it.? How you can extend schema.graphqls file in your own module? In this post, I will explain how to achieve this.

Lets take an example of adding brand name to my product details graphql which is served by ProductInterface object. We will be using manufacturer attribute to be our brand attribute and will get its value for each product.

In above interface, you can see there is a manufacturer attribute already available. You may also notice that the type for this attribute is added as Int But the issue with it is that it will give you the id of your manufacturer which is of no use to our users.

We require the name for the manufacturer and to accomplish this, we can create a new module which will extend Magento’s default ProductInterface and will inject our brand field to get brand name.

Lets create a new module with name JS_CatalogGraphQl
You will need to add sequence in our module’s module.xml file like below.

<module name="JS_CatalogGraphQl" setup_version="1.0.0">
	<sequence>
		<module name="Magento_GraphQl"/>
		<module name="Magento_CatalogGraphQl"/>
	</sequence>
</module>

Now create a schema.graphqls file in our etc directory.

interface ProductInterface @typeResolver(class: "Magento\\CatalogGraphQl\\Model\\ProductInterfaceTypeResolverComposite") @doc(description: "The ProductInterface contains attributes that are common to all types of products. Note that descriptions may not be available for custom and EAV attributes.") {
    brand: String @doc(description: "Brand Name based on manufacturer attribute") @resolver(class: "JS\\CatalogGraphQl\\Model\\Resolver\\Product\\Brand")
}

Here, we are using Magento’s default ProductInterface and adding one more field brand and its resolver class details.

Now create our resolver class at JS/CatalogGraphQl/Model/Resolver/Product/Brand.php

<?php
declare(strict_types=1);

namespace JS\CatalogGraphQl\Model\Resolver\Product;

use Magento\Catalog\Model\Product;
use Magento\Framework\Exception\LocalizedException;
use Magento\Framework\GraphQl\Config\Element\Field;
use Magento\Framework\GraphQl\Query\ResolverInterface;
use Magento\Framework\GraphQl\Schema\Type\ResolveInfo;

/**
 * Resolve data for product Brand name
 */
class Brand implements ResolverInterface
{
    /**
     * @inheritdoc
     */
    public function resolve(
        Field $field,
        $context,
        ResolveInfo $info,
        array $value = null,
        array $args = null
    ) {
        if (!isset($value['model'])) {
            throw new LocalizedException(__('"model" value should be specified'));
        }

        /* @var $product Product */
        $product = $value['model'];
        $optionText = '';
        $attr = $product->getResource()->getAttribute('manufacturer');
        if ($attr->usesSource()) {
            $optionText = $attr->getSource()->getOptionText($product->getManufacturer());
        }
        
        return ($optionText) ? : '';
    }
}

This will use product’s manufacturer attribute value and return its text value. You can use this field now in your graphql query file like below.

query productDetail($urlKey: String = "carmina-earrings") {
    productDetail: products(filter: { url_key: { eq: $urlKey } }) {
        items {
            sku
            name
            manufacturer
            brand
        }
    }
}

Here, do not remove default manufacturer field as it will be used to get manufacturer id for current product. One more thing to note here is as we have injected brand field to product interface, it can be fetched on product listing page and search results page because Magento uses this interface only on all places.

Now, you will be able to get brand name with your product details.

Magento PWA – Get store logo image to venia theme

Magento 2 introduced pwa-studio as their progressive web application representative. pwa-studio provides you a base architecture for integrating your Magento 2 setup with your Progressive Web Application storefront.
Magento 2 uses GraphQL to fetch data from Magento and ReactJS to represent the data to users. There are many components provided with pwa-studio to run a basic pwa storefront. It does not contain all features and functionalities Magento has to offer and still work its a work in progress prototype. Magento 2 community is improving Magento 2 architecture by adding GraphQL support for all its module and updating PWA studio to consume the GraphQL data and represent to user as a complete working e-commerce storefront.

Please refer to my previous post on How to use Query component in pwa-studio. In this post, I will provide you the code to fetch and display Store logo from Magento 2 admin panel.
Magento allows to add/update logo for your storefront from admin panel while pwa-studio is using (for now) static logo image in its directory structure. To get your store logo from admin panel, You will require to make changes to your Logo component present in pwa-studio directory located at `packages/venia-concept/src/components/Logo`. You will require to edit your logo.js file.

To get data from Magento, you need to make a query to magento’s endpoint. So, first, you need to import Query component to your logo.js file.

import { Query, resourceUrl } from 'src/drivers';
import storeLogoQuery from 'src/queries/getStoreLogo.graphql';

In first line, we are adding Query and resourceUrl components from pwa-studio’s drivers. These components will be used to make a query to Magento and to generate a URL for logo image respectively.
You will also require to create an GraphQL to get make a request and get the data you need. The second line we added is to let pwa-studio know where your graphql resides. I have created a new graphql to keep it separate from other graphql and it will only get the data we require to display Logo image.
Create a file getStoreLogo.graphql at `packages/venia-concept/src/queries` location.

query getStoreLogo {
     storeConfig {
         id
         header_logo_src
         logo_alt
         logo_height
         logo_width
     }
 }

Here, we are only requesting logo details like logo src, logo alt text, logo width and height. When magento will get the request from this graphQL it will only send us the details we have requested.
Now, to implement this in your logo.js file, you will require to update your `return()` function. Go to your packages/venia-concept/src/components/Logo/logo.js again and replace your return function with below code.

return ( 
    <Query query={storeLogoQuery}>    
    {({ loading, error, data }) => {    
        if (error) { return ''; }    
        if (loading) { return ''; }    
        return <img
            className={classes.logo}
            src={
                 resourceUrl( data.storeConfig.header_logo_src, {
                   type: 'image-header-logo',
                   width: data.storeConfig.logo_width
                 })
             }    
             height={data.storeConfig.logo_height}
             alt={data.storeConfig.logo_alt}
             title={data.storeConfig.logo_alt} />;
    }} </Query>
);

Here you can see we added a <Query> tag which is used in pwa-studio to make a query request to Magento backend. The `query` attribute denotes which graphQL query to execute. Here we have added storeLogoQuery which we have imported at start of the file.

Now, if you try to build your code again, it will give you an error of invalid type ‘image-header-logo‘ because it is a new image type we have introduced. By default pwa-studio provides two image types
1. image-product
2. image-category

These types are defined in packages/venia-concept/src/util/makeUrl.js file. So, we will require to add our new image type in the file to resolve the error. If you open the file for editing, you will see a constant named mediaBases. This variable consists of all of your media image file types and their location directories in Magento source code. You can add your image types and their location path as a new entry in this constant like below.

const mediaBases = new Map()
     .set(
         'image-product',
         process.env.MAGENTO_BACKEND_MEDIA_PATH_PRODUCT ||
         '/pub/media/catalog/product'
     )
     .set(
         'image-category',
         process.env.MAGENTO_BACKEND_MEDIA_PATH_CATEGORY ||
         '/pub/media/catalog/category'
     )
     .set(
         'image-header-logo',
         process.env.MAGENTO_BACKEND_MEDIA_PATH_LOGO ||
         '/pub/media/logo'
     );

Here, we added our image type with name ‘image-header-logo‘ and set the directory path as ‘/pub/media/logo‘, the directory where Magento stores its logo images.

Now build your pwa-studio again and execute watch command. You will be able to see your store logo at your pwa-studio in place of venia theme logo.

Magento PWA – How to use Query component

pwa-studio provides us with different components to utilise Magento’s functionalities. One of these component is Query component.

Query component allows you to make a graphql query request to Magento to get data served by it’s response. It also allows to handle errors and loading states. Below are the details how you can use its features. We will make a simple query request to get Magento store details.
First you will require to import Query component in your file. Query component is incorporated within pwa-studio’s src/drivers folder.

import { Query } from 'src/drivers';

You also need to import your getStoreConfigData.graphql file to your file which is Magento’s default graphql file to get Magento store related data.

import getStoreConfigData from 'src/queries/getStoreConfigData.graphql';

If you check your src/queries/getStoreConfigData.graphql file, you will see code like below.

query storeConfigData {
    storeConfig {
        id
        copyright
        cms_home_page // Added by us
        base_url // Added by us
    }
}

Here, you can see that the graphql makes a request to storeConfig handle and asks for only two details from Magento server.
1. id
2. copyright
But here we added two more fields to get data with default query fields.
3. cms_home_page
4. base_url

The best thing about graphql is that unlike REST api, it will give you the only details you ask for and nothing more. Above graphql will only get store id, copyright text, cms home page and it’s base_url from Magento. You can add more query arguments as you need.

Check your packages/venia-concept/lastCachedGraphQLSchema.json file for more details. This file contains all your graphql queries, their fields and field details like name, description, type, etc.
In this file go to
StoreConfig object and study its fields values. You can use any of these child fields in your src/queries/getStoreConfigData.graphql to get data.

Now, we can use our getStoreConfigData to Query component. Use below code in your render() function to display data provided by query response.

return (
     <Query query={storeConfigDataQuery}>
         {({ loading, error, data }) => {
             if (error) return <div>Error…</div>;
             if (loading || !data) return <div>Fetching Data…</div>;
             return (
                  <div>
                      <span>{data.storeConfig.base_url}</span>;
                      <span>{data.storeConfig.cms_home_page}</span>;
                      <span>{data.storeConfig.copyright}</span>;
                  </div>
              }
         }
     </Query>
 );

Query component uses query prop to determine which graphql query to execute. There are three main data manipulator in query component used to handle different stages of query execution.
loading: It is used to display your text or loader image to the storefront while the query is being executed and waiting for the data to be returned from graphql query response.
error: This is used to handle errors generated with your graphql request. If the request was not successful and completed with errors, you can display your custom message on storefront.
data: This is the data object returned from graphql request. It contains the response data in json format which you can manipulate or utilise as per your needs.

In our above example, we have added a custom message to display to users in case of any error. We have also added “Fetching Data…” text with loading state. It will be displayed to users when the request is in progress and waiting for response data.

Build your pwa using
yarn run build
and and execute watch command
yarn run watch:venia
to reflect the output on your storefront.

JS Launcher 2.1 – Magento 2 Navigation Launcher

Latest version, 2.1, of JS Launcher is released with new features added. With this version, you can navigate to CMS Pages and CMS Blocks using the launcher. Type in CMS Page name or Page title to go to any CMS page and Static block title or identifier for any static blocks.

Get the latest version from GitHub or install using composer.

 composer require jsutariya/launcher
php bin/magento module:enable JS_Launcher
php bin/magento setup:upgrade
php bin/magento cache:flush

With current version, you can search and navigate to below using launcher panel.

  • Menu Pages
  • Configuration section
  • Orders
  • Products
  • Customers
  • CMS Pages
  • CMS Blocks

Just Press CTRL+M to launch it and type in where you want to go or what you want to edit.